Hayden Hudson
Install Enterprise Manager Cloud Control
Introduction

The purpose of this documentation is to support my other blog post Stop exposing your password in your database connection strings, a topic on which I presented at the New England Oracle User Group conference on Nov 8th 2018. In my talk, I suggested that an excellent solution to removing the problem of exposing passwords in your sqlplus connection strings is with the use of Oracle Enterprise Manager Cloud Control (OEM).

That being said, there are many other reasons to consider installing OEM , especially if you have several databases under your care - chief among them:

  • 1. The OEM base is completely free. Though, there do exist optional packs you can add for a license cost.
  • 2. It’s a one-stop solution to inspecting and managing your servers. For example, it can automate your database backups.

In the spirit of being frank, I can think of some legitimate reasons not to install:

  • 1. You only have a couple of databases.
  • 2. The installation may be fairly simple but it is time-consuming. One step, as we’ll see, takes 3-4 hours.

Assumptions / Pre-requisites

1. This tutorial assumes that you already have at least one Oracle Database set-up.

The OEM can live in any database but I recommend installing it in a database that is separate from the one(s) you are manager, ideally the OEM database will exist on a separate compute instance. I will not be covering how to install a database / configure the necessary compute node.

2. This tutorial uses a Linux environment (Oracle Linux 7) but other Linuxes and even Windows should be pretty similar.

Download

The necessary downloads for OEM are available both on the Oracle Software Delivery Cloud portal and on the Oracle Technology Network . I used the edelivery site. Simply sign-in (or register) and search for ‘OMS’ to find the ‘Enterprise Manager Base Platform - OMS’.

As of the time of this writing, you’ll need to download 6 zip files. The download may take 10+ mins.

Install OEM

I'll be following the guidelines specified by the official Enterprise Manager Cloud Control Basic Installation Guide Guide for Release 13.3 .

Move your zip files to the desired location on your designated database server. I used the path ‘/usr/local/src/oracle/oem/’.

Now you’ll need to unzip them.
[oracle@c2oem oem]$ unzip '*.zip'
Archive:  V978760-01.zip
  inflating: em13300_linux64.bin     

Archive:  V978761-01.zip
 extracting: em13300_linux64-2.zip   

Archive:  V978762-01.zip
 extracting: em13300_linux64-3.zip   

Archive:  V978763-01.zip
 extracting: em13300_linux64-4.zip   

Archive:  V978764-01.zip
 extracting: em13300_linux64-5.zip   

Archive:  V978765-01.zip
 extracting: em13300_linux64-6.zip   

6 archives were successfully processed.
[oracle@c2oem oem]$ tree
.
├── em13300_linux64-2.zip
├── em13300_linux64-3.zip
├── em13300_linux64-4.zip
├── em13300_linux64-5.zip
├── em13300_linux64-6.zip
├── em13300_linux64.bin
├── V978760-01.zip
├── V978761-01.zip
├── V978762-01.zip
├── V978763-01.zip
├── V978764-01.zip
├── V978765-01.zip

0 directories, 12 files
Update server parameters
Update sysctl.conf
[root@c2oem oem]# vim /etc/sysctl.conf

# 2018-10-15 The below was updated for OEM 13.3 install 
net.ipv4.ip_local_port_range = 11000 65000

Update limits.conf
[root@c2oem oem]# vim /etc/security/limits.conf

# 2018-10-15 Hayden Hudson. The below was added for Oracle Database and OEM Install
*               soft    memlock         6291456 
*               hard    memlock         6291456
oracle          soft    nproc           3000
oracle          soft    nofile          3000
Make sure _allow_insert_with_update_check parameter is set to be true.

SYS@repcon AS SYSDBA> alter system set "_allow_insert_with_update_check"=true scope=both;

System altered.
Run installer

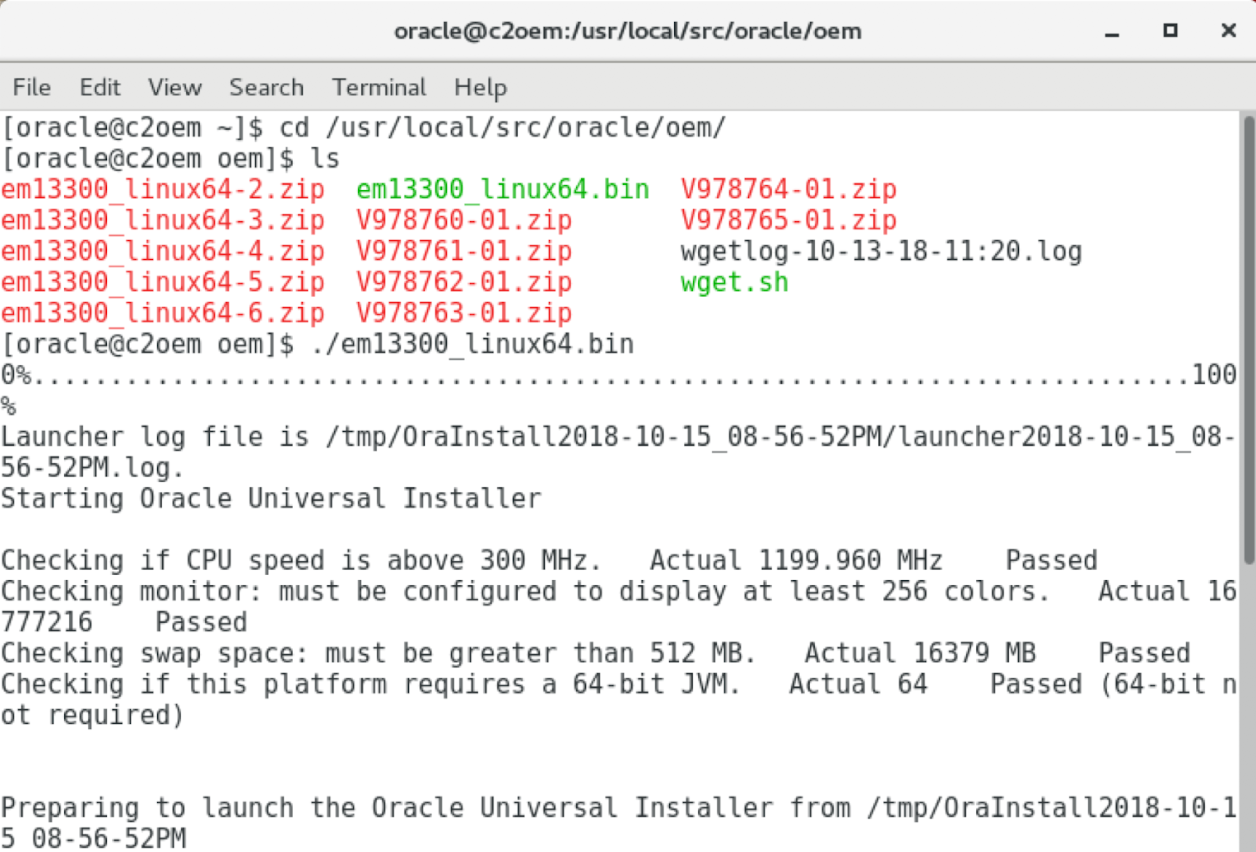
WARNING : this step takes 3-4 hours

You now kick off the installation by running the em13300_linux64.bin in the path '/usr/local/src/oracle/oem/'.

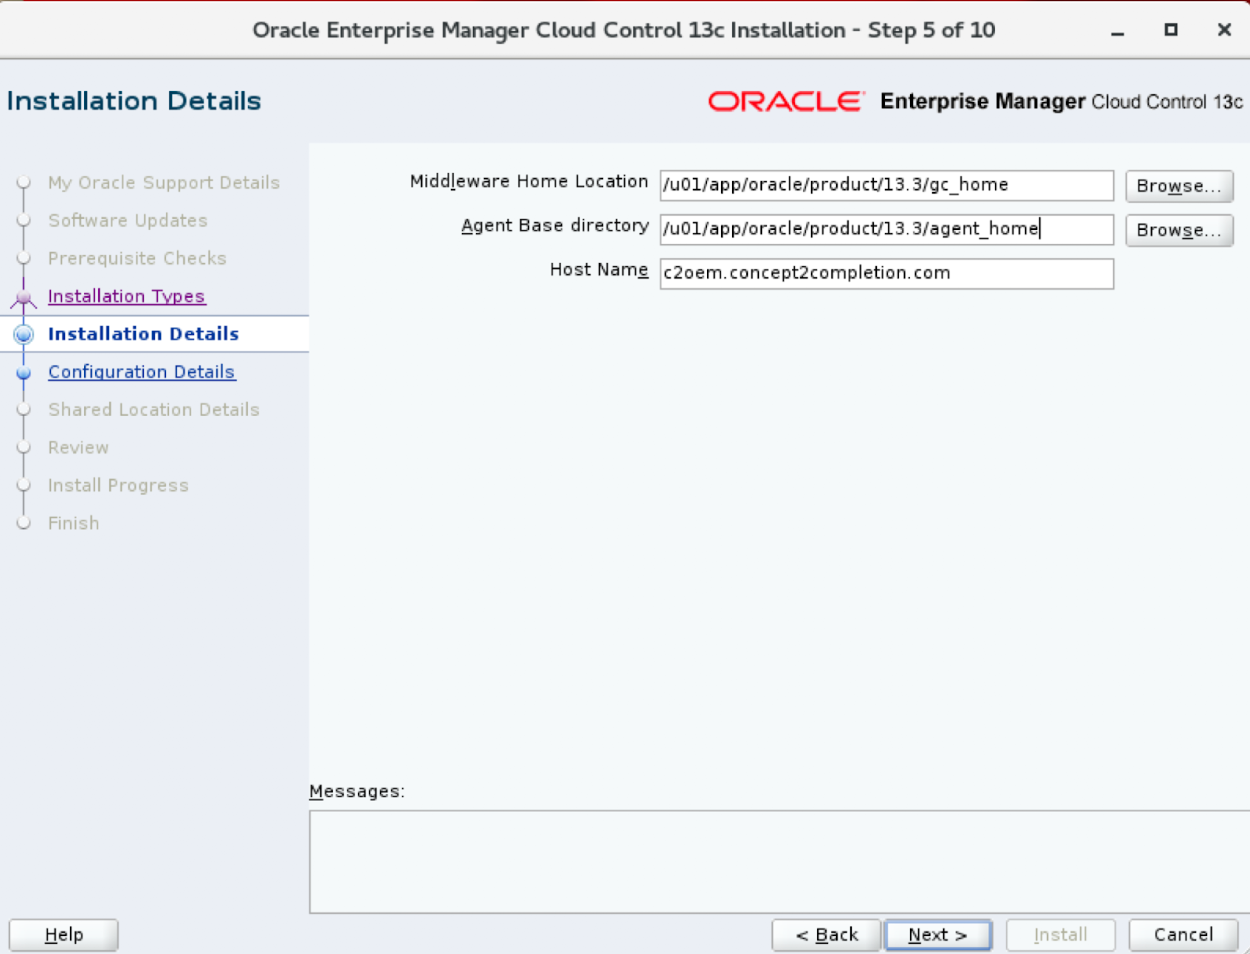
I'm skipping over steps 1-4 in the Installer because I just accepted the defaults. For step 5, you pick the directories where you'd like the OEM middleware and agent software to be installed. I picked '/u01/app/oracle/product/13.3/gc_home' and '/u01/app/oracle/product/13.3/agent_home', respectively.

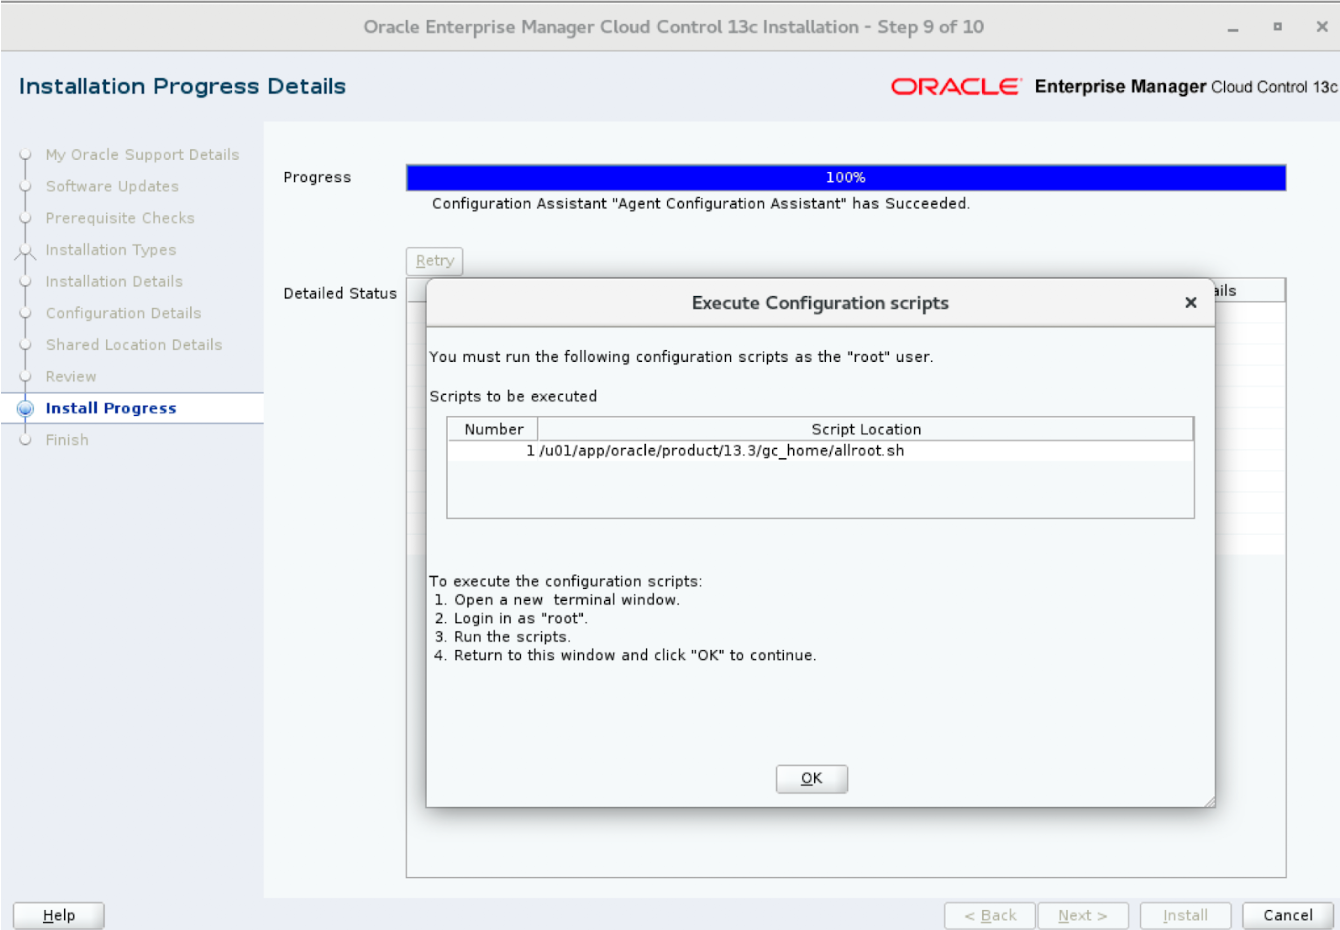
After a 3-4 hour installation period, a pop-up warns you that you'll need to run an additional script upon completion of this Oracle Installer.

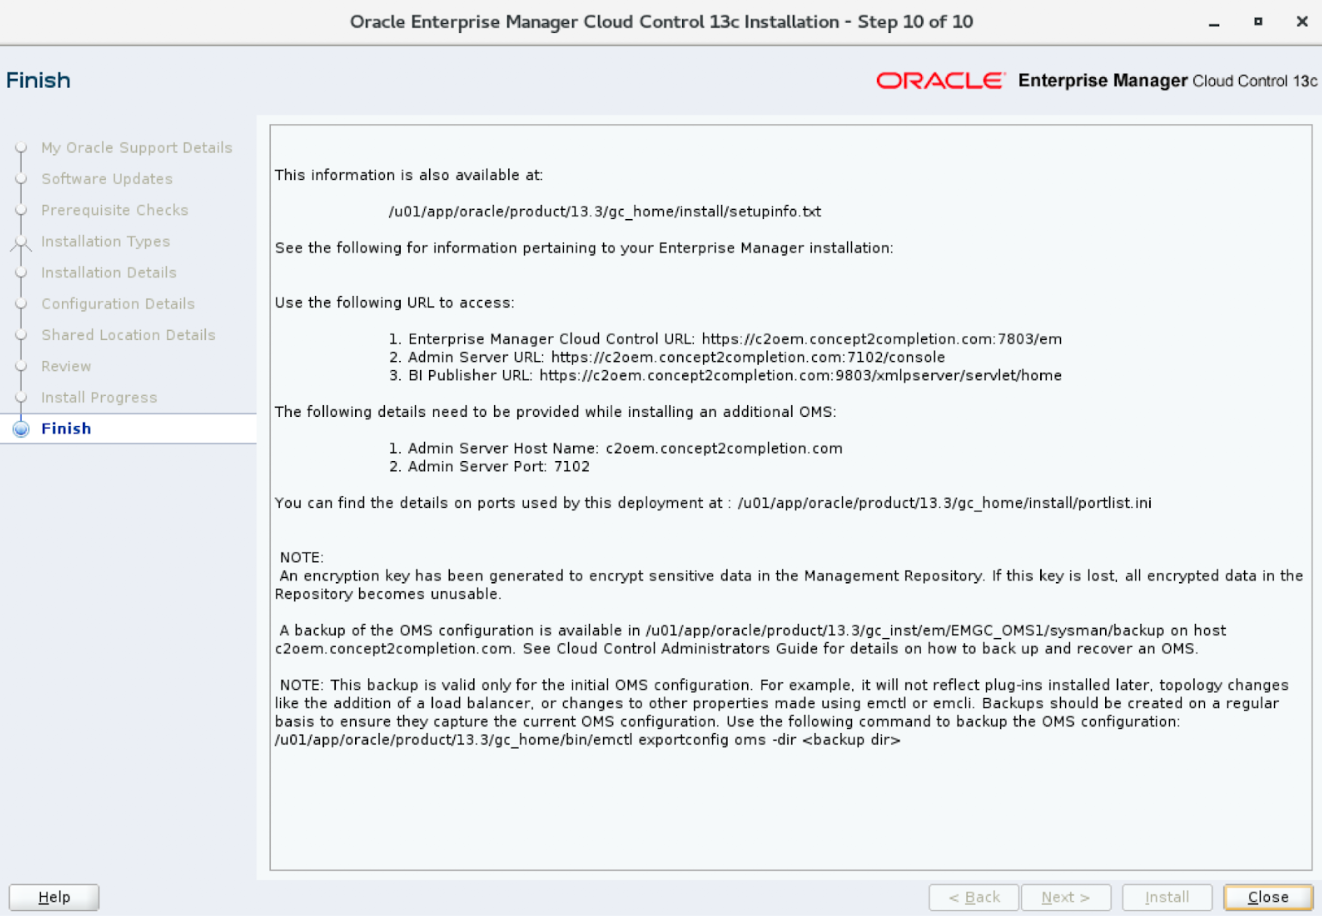
This is what a success confirmation screen looks like. It confirms that I should access my new admin console at the URL https://c2oem.concept2completion.com:7803/em.

Final step : Run allroot.sh
[root@c2oem gc_home]# pwd
/u01/app/oracle/product/13.3/gc_home
[root@c2oem gc_home]# ./allroot.sh 

Starting to execute allroot.sh ......... 

Starting to execute /u01/app/oracle/product/13.3/gc_home/root.sh ......
/etc exist

Creating /etc/oragchomelist file...
/u01/app/oracle/product/13.3/gc_home
Finished product-specific root actions.
/etc exist
Finished execution of  /u01/app/oracle/product/13.3/gc_home/root.sh ......


Starting to execute /u01/app/oracle/product/13.3/agent_home/agent_13.3.0.0.0/root.sh ......
Finished product-specific root actions.
/etc exist
Finished execution of  /u01/app/oracle/product/13.3/agent_home/agent_13.3.0.0.0/root.sh ......
Configure console

Upon 1st entry, short of having set up any other users, you'll need to log in as SYSMAN

You'll be invited to configure your home screen. I picked the 'summary' option.

I recommend prioritizing setting up your admin email. OEM will send you a test email as below to confirm success :

Set up named credentials

Before going any further, I recommend setting up some named credentials by navigating to 'Setup > Security > Named Credentials'

By way of example, I set up a 'global_sys' user to log in as sys across all my servers.

Add host targets

You have several options for how to add the servers you seek to manage using OEM. I picked the 'Install Agent on Host' option, in the path 'Security > Add Target > Add Targets Manually'.

Install agent on host : Step 1

Install agent on host : Step 2. Here you'll need to identify some directories on the destination server where the agent and base software should be installed. The credentials you designate below will need to have the requisite permissions to create these directories.

Install agent on host : Step 3

Install agent on host : Confirmation

Add database targets

I'll end this tutorial with instructions on how to add the databases you're seeking to manage. Back on the 'Add Target' screen (in the path 'Security > Add Target > Add Targets Manually'), this time you'll pick 'Add Non-Host Targets using Guided Process' and pick 'Oracle Database' from the menu:

Add non-host target - Step 1 : Pick Target server

Add non-host target - Step 2 : Provide credentials

Add non-host target: Confirmation

Date
Date : Nov. 4, 2018